How to build Rest Service with Spring Boot - A Step by Step Tutorial for Beginner - 5

In the How to build Rest Service with Spring Boot - A Step by Step Tutorial for Beginner - 4 of this series , I will show you how to validate the data entered by the Restful service interface in Spring Boot. This article will go deeper and demonstrate how to use Swagger to generate documentation for a Restful service interface and test the API with pages generated by Swagger.

In microservice development, each microservice developer needs to provide API documents to consumers, and traditionally uses Word documents. But the more prone problems with Word documents are:

  1. The documentation and code are not synchronized or there are multiple versions of the document, so that I see the document and don’t know how to use it?
  2. You can’t test the API on a web page, but you need to install some tools to test it, especially for APIs that are not GET methods

Swagger solves the above problems, and Spring Boot provides a very simple way to integrate the concrete implementation of Swagger. Let’s take you to experience it:

Basic settings

Add dependency libraries, modify pom.xml files

1
2
3
4
5
6
7
8
9
10
11
12
13
14
15
<!-- Swagger -->
<dependency>
<groupId>io.springfox</groupId>
<artifactId>springfox-swagger2</artifactId>
<version>2.8.0</version>
<scope>compile</scope>
</dependency>

<dependency>
<groupId>io.springfox</groupId>
<artifactId>springfox-swagger-ui</artifactId>
<version>2.8.0</version>
<scope>compile</scope>
</dependency>
<!-- End Swagger -->

Then create a new Configuration Class for Spring Boot to configure Swagger. The code is as follows:

1
2
3
4
5
6
7
8
9
10
11
12
13
14
15
16
17
@Configuration
public class SwaggerCofnig extends WebMvcConfigurationSupport {

@Bean
public Docket apis() {
return new Docket(DocumentationType.SWAGGER_2);
}

@Override
protected void addResourceHandlers(ResourceHandlerRegistry registry) {
registry.addResourceHandler("swagger-ui.html")
.addResourceLocations("classpath:/META-INF/resources/");
registry.addResourceHandler("/webjars/**")
.addResourceLocations("classpath:/META-INF/resources/webjars/");
}

}

Finally, add a new annotation @@EnableSwagger2 to the app’s startup class, as follows:

1
2
3
4
5
6
7
8
9
@SpringBootApplication
@EnableSwagger2
public class TodoApplication {

public static void main(String[] args) {
SpringApplication.run(TodoApplication.class, args);
}

}

Now, running the program and accessing

1
http://localhost:8080/v2/api-docs

, we can get the API description that Swagger generated for the application, json format:

1
2
3
4
5
6
7
8
9
10
11
12
13
14
15
16
17
18
19
20
21
22
23
24
25
26
27
28
29
30
31
32
33
34
35
36
37
38
39
40
41
42
43
44
45
46
47
48
49
50
51
52
53
54
55
56
57
58
59
60
61
62
63
64
65
{
"swagger": "2.0",
"info": {
"description": "Api Documentation",
"version": "1.0",
"title": "Api Documentation",
"termsOfService": "urn:tos",
"contact": {},
"license": {
"name": "Apache 2.0",
"url": "http://www.apache.org/licenses/LICENSE-2.0"
}
},
"host": "localhost:8080",
"basePath": "/",
"tags": [{
"name": "basic-error-controller",
"description": "Basic Error Controller"
}, {
"name": "todo-api",
"description": "Todo Api"
}],
"paths": {
...
"/todo": {
"get": {
"tags": ["todo-api"],
"summary": "getTodoList",
"operationId": "getTodoListUsingGET",
"produces": ["*/*"],
"responses": {
"200": {
"description": "OK",
"schema": {
"$ref": "#/definitions/ApiResult"
}
},
"401": {
"description": "Unauthorized"
},
"403": {
"description": "Forbidden"
},
"404": {
"description": "Not Found"
}
}
},
"post": {
"tags": ["todo-api"],
"summary": "addTodo",
"operationId": "addTodoUsingPOST",
"consumes": ["application/json"],
"produces": ["*/*"],
"parameters": [{
"in": "body",
"name": "todo",
"description": "todo",
"required": true,
"schema": {
"$ref": "#/definitions/Todo"
}
}],
},
...

Because there are more contents, I will not list them all here. However, as you can see, Swagger not only generates the API description of the application, but also the description of the default system API for Spring Boot.

Of course, viewing in json is too cumbersome for developers. Is there a better way to check it out?

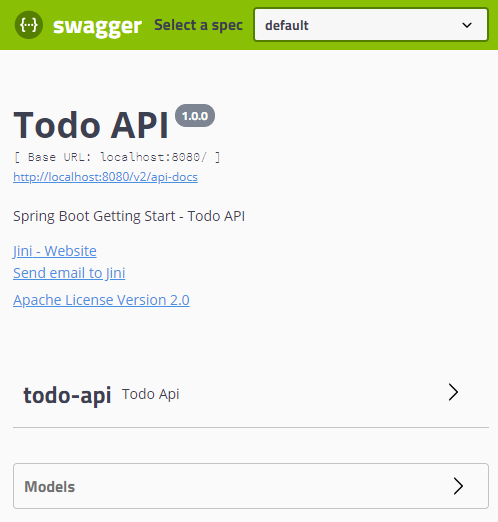
Visit localhost:8080/swagger-ui.html and you’ll see beautiful documentation.

API Documentation that Swagger generated

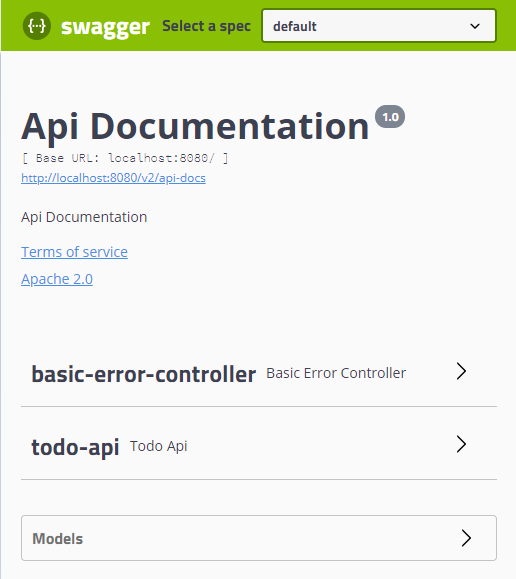
Expand ‘todo-api’ node

API Documentation that Swagger generated

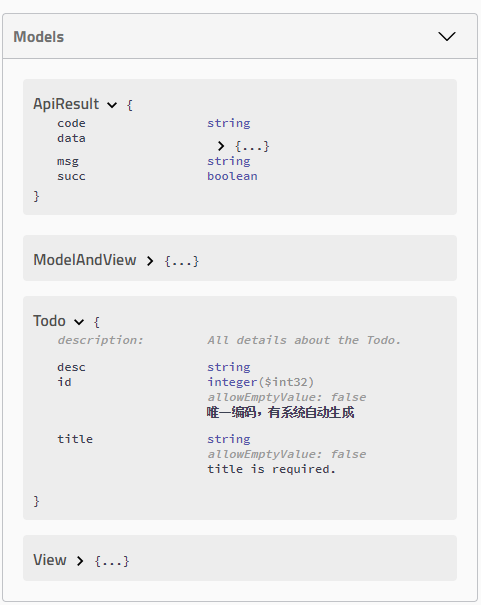
There are also models used in the API that also generate documentation, which is very cool.

API Documentation that Swagger generated

Only the API of the application itself is generated

After reading the documentation output by Swagger above, including the API of the Spring Boot framework, but also including the application’s own API, it looks a bit messy, and usually we don’t care about the framework’s API, can we limit the API that only generates the application itself? Of course, this can be achieved by modifying the configuration information of Swagger.

Open the configuration class SwaggerCofnig .java, call the select method after generating the Docket object to filter, below we filter by the package name and URL path name:

1
2
3
4
5
6
7
8
@Bean
public Docket apis() {
return new Docket(DocumentationType.SWAGGER_2)
.select()
.apis(RequestHandlerSelectors.basePackage("cn.com.hohistar.tutorial.springboot.starter"))
.paths(regex("/todo.*"))
.build();
}

After modifying it, run the program again and open the URL:

1
http://localhost:8080/swagger-ui.html

API Documentation that Swagger generated

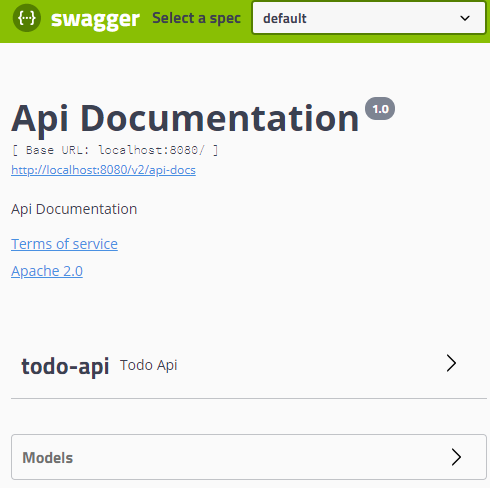
As you can see, only the API and related models of the app are left.
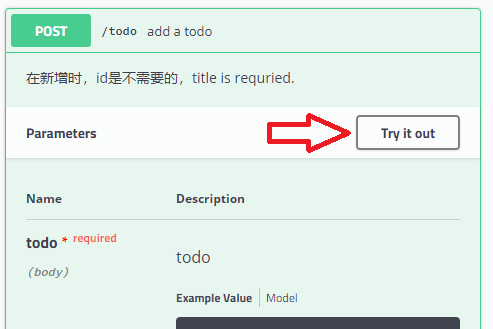
Test the API

In fact, with the HTML page generated by Swagger, we can not only view the information of the API, but also test the API on the page ourselves, which is simply inconvenient! In the past, this was solved with curl and Postman.

Test Api with Swagger UI

Add App Information

Now, let’s change the app information in the Swagger build page. Or modify the Swagger configuration class to include contact and app information.

1
2
3
4
5
6
7
8
9
10
11
12
13
14
15
16
17
18
19
20
21
22
23
24
25
26
27
28
29
30
31
32
33
34
35
@Configuration
@EnableSwagger2
public class SwaggerCofnig extends WebMvcConfigurationSupport {

public static final Contact DEFAULT_CONTACT = new Contact(
"Jini", "https://www.mls-tech.info", "mls-tech@qq.com");

public static final ApiInfo DEFAULT_API_INFO = new ApiInfoBuilder()
.title("Todo API")
.description("Spring Boot Getting Start - Todo API")
.version("1.0.0")
.license("Apache License Version 2.0")
.licenseUrl("https://www.apache.org/licenses/LICENSE-2.0")
.contact(DEFAULT_CONTACT)
.build();

@Bean
public Docket apis() {
return new Docket(DocumentationType.SWAGGER_2)
.select()
.apis(RequestHandlerSelectors.basePackage("cn.com.hohistar.tutorial.springboot.starter"))
.paths(regex("/todo.*"))
.build()
.apiInfo(DEFAULT_API_INFO);
}

@Override
protected void addResourceHandlers(ResourceHandlerRegistry registry) {
registry.addResourceHandler("swagger-ui.html")
.addResourceLocations("classpath:/META-INF/resources/");
registry.addResourceHandler("/webjars/**")
.addResourceLocations("classpath:/META-INF/resources/webjars/");
}

}

The key change is in line 24 of the code, where custom application information is added for Docket. The running result is shown in the following figure:

Test Api with Swagger UI

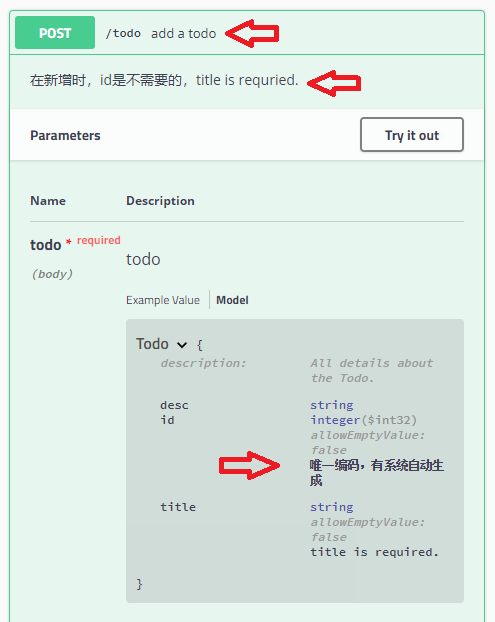
Add information to interfaces and models

If we also want to provide some additional instructions for the API or related Models, this Swagger also provides support:

  1. Add api descriptions, open TodoApi .java files, and add @ApiOperation annotations to the method definitions.
1
2
3
4
5
6
7
8
9
10
11
12
@PostMapping
@ApiOperation(value = "add a todo", notes = "在新增时,id是不需要的,title is requried.")
public ApiResult addTodo(@Valid @RequestBody Todo todo) {

ApiResult.ApiResultBuilder builder = ApiResult.builder().succ(false).build().toBuilder();

todoBiz.addTodo(todo);

builder.succ(true);

return builder.build();
}
  1. Add a Model description, open a Todo .java file, add an @ApiModel annotation to the class definition, and add an ApiModelProperty annotation to the attribute that requires a description
1
2
3
4
5
6
7
8
9
10
11
12
13
14
15
16
17
18
19
@Data
@AllArgsConstructor
@NoArgsConstructor
@Entity
@ApiModel(description = "All details about the Todo.")
public class Todo {

@Id
@GeneratedValue(strategy=GenerationType.AUTO)
@ApiModelProperty(notes = "唯一编码,有系统自动生成")
private Integer id;

@NotNull
@ApiModelProperty(notes = "title is required.")
private String title;

private String desc;

}

Start the program again and you can see the newly added instructions.

Test Api with Swagger UI

本文标题:How to build Rest Service with Spring Boot - A Step by Step Tutorial for Beginner - 5

文章作者:Morning Star

发布时间:2022年01月21日 - 09:01

最后更新:2022年01月21日 - 09:01

原始链接:https://www.mls-tech.info/java/springboot-rest-api-tutorial-5-en/

许可协议: 署名-非商业性使用-禁止演绎 4.0 国际 转载请保留原文链接及作者。